
This year has seen a bit of change for our little family. We moved from Brisbane to the Gold Coast, moved the kid’s school and then there is everything new that comes with all of that change! Our kids have been incredible throughout!! So, after doing a mini cubby reno for my niece and nephew earlier in the year (and seeing how much they loved it) we decided it was time to do the same at our new place for our kids!
After sharing our first reno we got a bunch of questions (crazy how much us parents love a cubby too! ha ha). So, this time I have decided to collate the question themes and blog them for you, so that all the info on how we went about it is out there for anyone who may be considering doing their own reno sometime soon!
Where did you get the cubby?
Both of the cubby houses that we have got are from Hide & Seek Kids! We did look around for quite a while prior to ordering and what sold us on the Hide & Seek Cubby’s was a few things; they are great quality, once painted correctly they are water tight, easy to put together (they come in panels) & there was lots of info on the Hide & Seek site we could easily see before we even decided to buy. The number one seller for us has been the Hide & Seek Kids team though. They are a small family run business so when you talk to them for advice etc you are talking to people who know their product intimately (they design, monitor production and quality check everything!) and they are incredibly passionate about what they do!

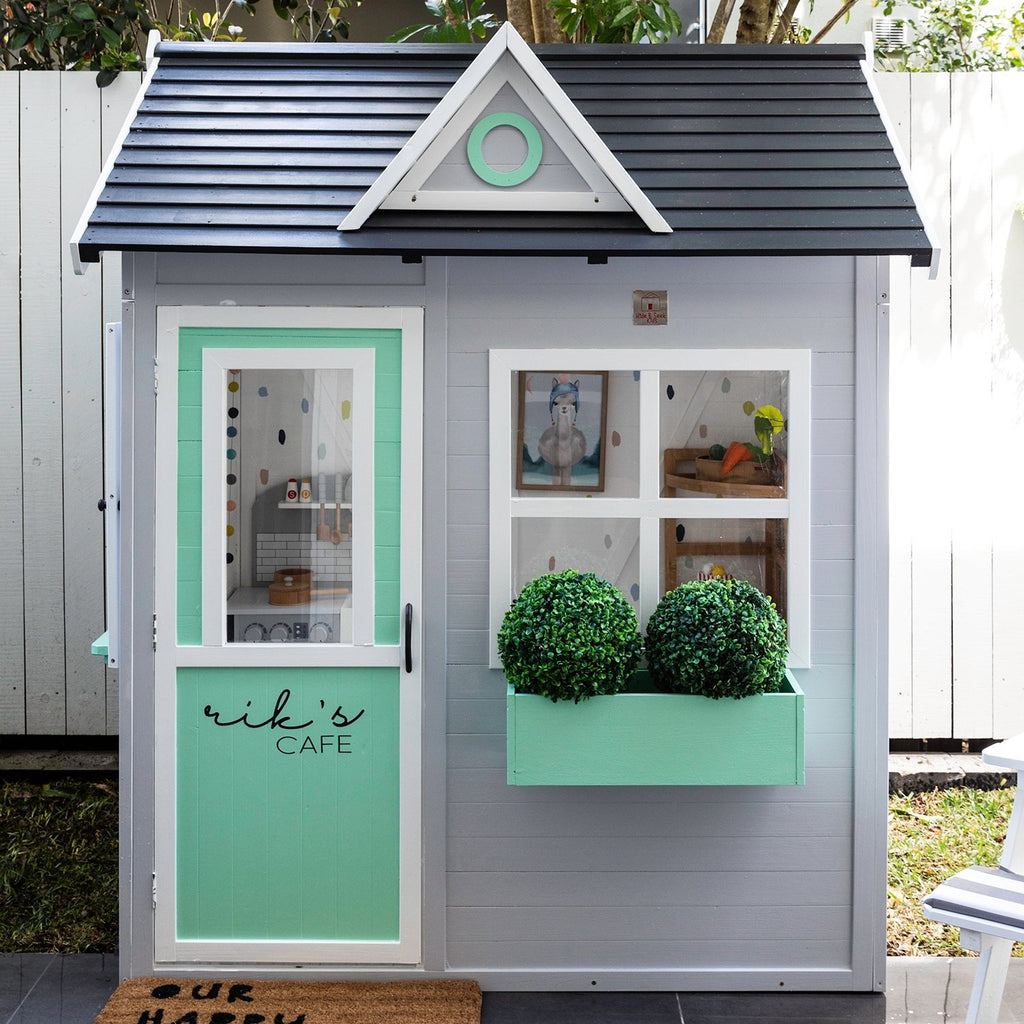
Rik’s Cafe – Hide & Seek Kids
Which cubby did you choose and why?
We chose the Harper Cubby for a couple of reasons. a) Because we loved the design (hello, super cute) and b) it was the right size for our space. We live in a townhouse so only have limited room. Our backyard is about 8m x 4m so the Harper Cubby fits perfectly – not too small, not too big.
We also got a couple of extras; the Grey Play Kitchen, 2 x Flower Boxes & the Picnic Table with Umbrella & Cushions. We chose these for their fit to our space, to add a few more play elements and also that they were at a great price for quality pieces.
Where did you start when planning the cubby design?
There are a couple of things that I always start with in any new design; theme & colour palette.
When we moved our son was probably the most affected. He was only five and found it a little difficult to understand. Even though he struggled, he held his head high and made it work. Not long after we moved we also found out I was pregnant with his third sister (poor guy! Lol), so we always wanted this to be his kingdom. Not a girly space & not a girly theme in sight! A space where he could feel that it was his little domain in a house of so many girly things! And that’s how we came up with ‘Rik’s Café’.
Our palette was also a little dictated by our internal space since the cubby is almost a part of our living, dining & kitchen. These spaces are black, white, grey, natural timber with pops of mint, aqua & navy. This made for the perfect masculine base and I added a few extra ‘fun pops of colour’ to make it a little more kid friendly.

Rik’s Cafe – Colour Palette
From there I simply added pieces that worked with both the theme and palette (or as close to). I’m a big fan of creating spaces that I personally would have considered magical as a child. I like to give them pieces to play with, make the space multifunctional (kitchen, reading space, dining setting), add colour that ignites emotion and really let them dream it up from there!

Rik’s Cafe – Cubbys can work in small spaces too!
Was it hard to paint?
I don’t find painting hard personally but painting a cubby is definitely effort if you want to do it properly. I think the way to see it is that it’s like a mini house. You spend quite a bit of money on them so it’s important to take care of it to start with, so that it lasts!
All of the paint that we used was Taubmans. (When we built our last house all the paint was Taubmans so it’s a brand that we know and trust. I also love the colour choices that they have).
-> We did two coats of undercoat on all surfaces, including the underside of the floor, before applying colour.
-> We then used two coats of gloss paint on all internal walls, front door, planters & the picnic table to make them easy to wipe clean.
-> We also used gloss but did three coats on the roof to help keep the water out.
-> All of the external panels & the floor received two coats of matte paint.
-> Because we used multiple colours we did have to paint base colour, wait for it to dry so that we could then apply the next colour etc.
-> And at the end there was a little bit of touch up work to do it (#perfectionistissues)!
So, while it’s not hard per say, you can understand that that much painting does take time to get through. All up we probably applied as many coats as we could for around 1.5 hours per day (the time we had full sun) and it took us 3 weeks at that pace. Be prepared to paint and you will be fine! For me it was a great outlet for my inner Picasso!!
The Hide & Seek Kids team also have a great painting guide / tips that you can find here.
How much paint did you use?
Undercoat – Taubmans 3 in 1 Prep – 5L
2 coats on the whole cubby (inside and out). 2 coats on the picnic table. 2 coats on 2 x planter boxes.
Colour coat – Taubmans Sunproof Exterior Gloss – Monument – Less than 1L
3 coats on the external of the roof & 2 coats on all door and window handles.
Colour coat – Taubmans Sunproof Exterior Gloss – Minty Green – Less than 1L
2 coats on the external of the door, the shop shelf, the circle feature & 2x planet boxes (inside and out).
Colour coat – Taubmans Sunproof Exterior Gloss – Cotton Ball – 3L
2 coats on the internal walls & roof. 2 coats on all of the trims. 2 Coats on the picnic table.
Colour coat – Taubmans Sunproof Exterior Matte – Leaden Sky – 1L
2 coats on all exterior walls & on the internal floor.
Any painting tips?
Ok! I’ve said it before and I’ll say it again. We definitely aren’t painting pro’s!!!! But …. these are the things that either did or would have made the painting side easier for us:

Rik’s Cafe – Cafe Table
-> We ended up using a cheap roller brush for most of the panel painting. I’m not sure of the brand but they are the yellow roller packs from Bunnings. Be sure to grab the right roller heads for your paint type and grab a big pack (fairly cheap) so you can just throw out after each use!
-> The key is to get the roller full of paint and make sure to squeeze the brush in to all the nooks and crannies!
-> For brush ‘cutting in’ I love the Monarch brushes. They are great quality, can be a bigger price but the finish is worth it and you can keep them as they wash out well!
-> For really fine ‘cutting in’ I used one of my watercolour paint brushes (Judy Burrows No.16 Round from Officeworks). The same thing as the monarch brush, they have great quality fibres that just make the paint finish that much nicer.
-> We used a paint tray per colour but then got some great advice – Use tin foil to line the tray before you add paint, then you can just take out the foil and use again for the next colour.
-> The same paint guru also gave us the tip to cover the tray with glad wrap and keep out of the sun to store left overs. Then you can use the paint again for the next coat.
-> We got lots of advice to use a spray gun as a time saver. If you have a read of the Hide and Seek Kids painting guide you will understand that the most important thing you can do if you want a water resistant cubby is to paint by hand. It’s all about getting the paint in to all the nooks and crannies but also making sure there is enough paint on the timber to seal it properly! So if you are hoping for your cubby to be water resistant, stick to hand painting!
-> We don’t have a huge amount of sun in our backyard. I think if you have room to dry the painted panels in the sun for a bigger part of the day, it would definitely save time and you could do more in a day!
-> Let each colour fully dry before applying the next colour if there are boarders that meet.
-> I hand painted all of the cutting in because I find that easier then taping.
-> We waited until all paint was done before adding the Perspex to the windows. Just meant we didn’t have to do any taping around those.
-> We also painted all panels completely before putting the cubby together.
-> We used a trestle table to paint the panels on. We did it like that to make it easier for my heavily pregnant belly but I think it definitely makes it easier to not have to bend down too far for anyone!
-> Get the grandparents to look after the kids and do a mum & dad painting day! Why didn’t I think of that!!
Was it hard to put together?
Honestly, I think putting it together was the simplest part! After painting all the parts before putting it together, it was really familiar. The instructions are also very detailed and easy to read. It took two of us just over an hour.
What happens when it rains?
Nothing! We’ve had quite a few heavy storms since setting the cubby up and we haven’t had any water inside. The widow and door frames aren’t completely sealed so it’s possible if it rained at the right angle you may get a little but we’ve been through light rain, heavy rain, strong wind and hail with none! This is where all the effort in to painting well to start with really comes in tho play! The window and door magnets are also quite firm so there has been no flapping around etc. Not even a sound!

Rik’s Cafe – Reading Corner
Where did you get all the pieces to go inside?
Ok here is the list of what we bought for the kids to start with. (I have linked the stores websites below, so click each business name to go straight through to the product)!
Harper Cubby, Planter Boxes, Picnic Table and Play Kitchen – Hide & Seek Kids
Door Mat – Don’t be a Door Mat
Letterboard – TwelfthletterL
Orders Sign – CMC Gold
Round Plants in Planters – Bunnings
Felt Ball Garland – Winston & Grace
Clock – by Clocksicle available at Harry and the Hound
Llama & Rainbow Prints – My Hidden Forest
Decals Back Wall & Rik’s Café sign – Blond + Noir
Oak Wall Shelves – The Timba Trend & Folk
Corner Bamboo Shelf, hanging planter & Dustpan + Brush – Kmart
Popcorn, Ice Creams, Watermelon & Burger – Make me Iconic
Felt Food – Chook Shed Designs
Floor cushions – Urban Road
You are welcome!! x

Rik’s Cafe – The Kitchen!
Is it worth the effort?
For me, the answer is yes! 100% !! Our kids have spent so much time in there. It’s like their own little private world. The games they play are so varied and each time just listening to their make believe, endless giggles & seeing them happy definitely makes it worth the cost and effort!

Rik’s Cafe – The Happy Place!
Do the kids get over it?
I’m sure there will come an age that they aren’t as interested but so far, our 8, 6 & 2 and a half year old have played in it every day. Even in the rain! I think it helps that the cubby is positioned where we can see & hear everything. We just open the doors in the morning and it’s become their play space.
My niece & nephew also spend a huge amount of time in theirs 5 months on!
Hopefully that covers off the main question themes but if you have any others please leave a comment on our most recent Cubby Reno Instagram post or in the comments below!
Happy reno time!!!
Elisa xx